

Learn Helm by practice in this tutorial. Understand what Helm is and how to package an app with Helm charts. Manage upgrades and rollbacks in Kubernetes
Today, Kubernetes becomes a must for DevOps practitioners for orchestrating containers. Once you have a Docker image of your application, you have to write YAML manifests to define Kubernetes workloads. Next, you deploy them with the kubectl command.
This deployment way is when you've only one application. When you start to have many applications and multiple environments it becomes overwhelmed. Often you define the same YAML files 90% of the time.
Here, we are going to focus on how to manage applications smartly with Helm.
What Is Helm?
Helm is a package manager for Kubernetes. Helm is an open-source project originally created by DeisLabs and donated to the Cloud Native Foundation (CNCF). The CNCF now maintains and has graduated the project. This means that it is mature and not just a fad.
Package management is not a new concept in the software industry. On Linux distros, you manage software installation and removal with package managers such as YUM/RPM or APT. On Windows, you can use Chocolatey or Homebrew on Mac.
Helm lets you package and deploy complete applications in Kubernetes. A package is called a "Chart". Helm uses a templating system based on Go template to render Kubernetes manifests from charts. A chart is a consistent structure separating templates and values.
As a package, a chart can also manage dependencies with other charts. For example, if your application needs a MySQL database to work you can include the chart as a dependency. When Helm runs at the top level of the chart directory it installs whole dependencies. You have just a single command to render and release your application to Kubernetes.
Helm charts use versions to track changes in your manifests – thus you can install a specific chart version for specific infrastructure configurations. Helm keeps a release history of all deployed charts in a dedicated workspace. This makes easier application updates and rollbacks if something wrong happens.
Helm allows you to compress charts. The result of that is an artifact comparable to a Docker image. Then, you can send it to a distant repository for reusability and sharing.
What Are the Benefits of Using Helm?
- Helm provides you the ability to install applications with a single command. A chart can contain other charts as dependencies. You can consequently deploy an entire stack with Helm. You can use Helm like docker-compose but for Kubernetes.
- A chart includes templates for various Kubernetes resources to form a complete application. This reduces the microservices complexity and simplifies their management in Kubernetes.
- Charts can be compressed and sent to a distant repository. This creates an application artifact for Kubernetes. You can also fetch and deploy existing Helm charts from repositories. This is a strong point for reusability and sharing.
- Helm maintains a history of deployed release versions in the Helm workspace. When something goes wrong, rolling back to a previous version is simply — canary release is facilitated with Helm for zero-downtime deployments.
- Helm makes the deployment highly configurable. Applications can be customized on the fly during the deployment. By changing parameters, you can use the same chart for multiple environments such as dev, staging, and production.
- Streamline CI/CD pipelines – Forward GitOps best practices.
Quick Look On The Problem Helm Solves
Basic Kubernetes practice is to write YAML manifests manually. We'll create minimum YAML files to deploy NGINX in Kubernetes.
Here is the Deployment that will create Pods:
apiVersion: apps/v1
kind: Deployment
metadata:
  name: nginx
spec:
  selector:
    matchLabels:
      app: nginx
  replicas: 1
  template:
    metadata:
      labels:
        app: nginx
    spec:
      containers:
      - name: nginx
        image: nginx:1.21.6
        ports:
- containerPort: 80The Service exposes NGINX to the outside. The link with pod is done via the selector:
apiVersion: v1
kind: Service
metadata:
  name: nginx
spec:
  selector:
    app: nginx
  ports:
    - protocol: TCP
      port: 80
targetPort: 8080Now we have to create the previous resources with the kubectl command:
$ kubectl create -f deployment.yaml
$ kubectl create -f service.yaml
We check all resources are up and running:
$ kubectl get deployment -l app=nginx
NAME    READY   UP-TO-DATE   AVAILABLE   AGE
nginx   1/1     1            1           8m29s
$ kubectl get pods -l app=nginx
NAME                     READY   STATUS    RESTARTS   AGE
nginx-65b89996ff-dcfs9   1/1     Running   0          2m26s
$ kubectl get svc -l app=nginx
NAME    TYPE        CLUSTER-IP      EXTERNAL-IP   PORT(S)   AGE
nginx   ClusterIP   10.106.79.171   <none>        80/TCP    4m58s
- Specific values in YAML manifests are hardcoded and not reusable.
- Redundant information to specify such as labels and selectors leads to potential errors.
- Kubectl does not handle potential errors after execution. You've to deploy each file one after the other.
- There's no change traceability.
Create a Helm Chart From Scratch
Helm can create the chart structure in a single command line:
$ helm create nginxUnderstand the Helm chart structure
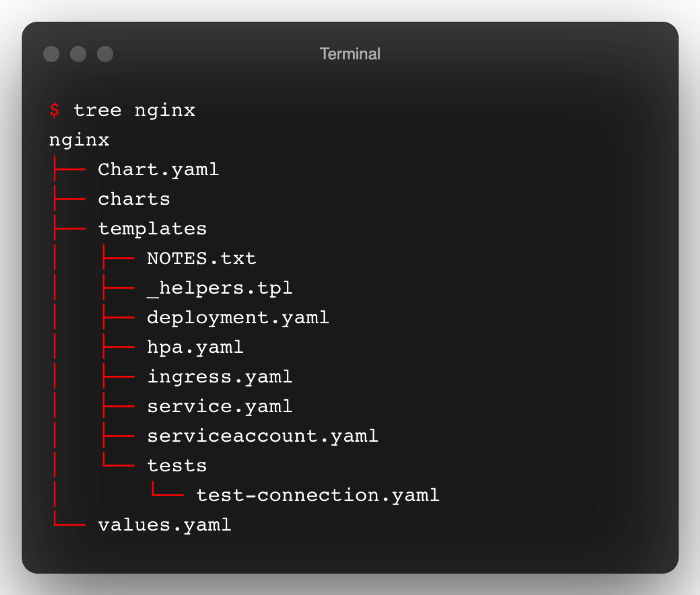
Chart.yaml: A YAML file containing information about the chart.charts: A directory containing any charts upon which this chart depends on.templates: this is where Helm finds the YAML definitions for your Services, Deployments, and other Kubernetes objects. You can add or replace the generated YAML files for your own.templates/NOTES.txt: This is a templated, plaintext file that gets printed out after the chart is successfully deployed. This is a useful place to briefly describe the next steps for using the chart.templates/_helpers.tpl: That file is the default location for template partials. Files whose name begins with an underscore are assumed to not have a manifest inside. These files are not rendered to Kubernetes object definitions but are available everywhere within other chart templates for use.templates/tests: tests that validate that your chart works as expected when it is installedvalues.yaml: The default configuration values for this chart
Customize the templates
The values.yaml is loaded automatically by default when deploying the chart. Here we set the image tag to 1.21.5 :
# Default values for nginx.
# This is a YAML-formatted file.
# Declare variables to be passed into your templates.

replicaCount: 1

image:
  repository: nginx
  pullPolicy: IfNotPresent
  # Overrides the image tag whose default is the chart appVersion.
  tag: "1.21.5"

imagePullSecrets: []
nameOverride: ""
fullnameOverride: ""

serviceAccount:
  # Specifies whether a service account should be created
  create: true
  # Annotations to add to the service account
  annotations: {}
  # The name of the service account to use.
  # If not set and create is true, a name is generated using the fullname template
  name: ""

podAnnotations: {}

podSecurityContext: {}
  # fsGroup: 2000

securityContext: {}
  # capabilities:
  #   drop:
  #   - ALL
  # readOnlyRootFilesystem: true
  # runAsNonRoot: true
  # runAsUser: 1000

service:
  type: ClusterIP
  port: 80

ingress:
  enabled: false
  className: ""
  annotations: {}
    # kubernetes.io/ingress.class: nginx
    # kubernetes.io/tls-acme: "true"
  hosts:
    - host: chart-example.local
      paths:
        - path: /
          pathType: ImplementationSpecific
  tls: []
  #  - secretName: chart-example-tls
  #    hosts:
  #      - chart-example.local

resources: {}
  # We usually recommend not to specify default resources and to leave this as a conscious
  # choice for the user. This also increases chances charts run on environments with little
  # resources, such as Minikube. If you do want to specify resources, uncomment the following
  # lines, adjust them as necessary, and remove the curly braces after 'resources:'.
  # limits:
  #   cpu: 100m
  #   memory: 128Mi
  # requests:
  #   cpu: 100m
  #   memory: 128Mi

autoscaling:
  enabled: false
  minReplicas: 1
  maxReplicas: 100
  targetCPUUtilizationPercentage: 80
  # targetMemoryUtilizationPercentage: 80

nodeSelector: {}

tolerations: []

affinity: {}You can specify a specific values.yaml file to customize the deployment for environment-specific settings
Install The Helm Chart
Good advice before deploying a Helm chart is to run the linter if you made an update:
$ helm lint nginx
==> Linting nginx
[INFO] Chart.yaml: icon is recommended

1 chart(s) linted, 0 chart(s) failed
Run Helm to install the chart in dry-run and debug mode to ensure all is ok:
$ helm install --debug --dry-run nginx nginx Using helm linter and dry-run install with debug mode will save you precious time in your development.
To install the chart, remove the --dry-run flag:
$ helm install nginx nginx
NAME: nginx
LAST DEPLOYED: Mon Mar 14 12:01:46 2022
NAMESPACE: default
STATUS: deployed
REVISION: 1
NOTES:
1. Get the application URL by running these commands:
  export POD_NAME=$(kubectl get pods --namespace default -l "app.kubernetes.io/name=nginx,app.kubernetes.io/instance=nginx" -o jsonpath="{.items[0].metadata.name}")
  export CONTAINER_PORT=$(kubectl get pod --namespace default $POD_NAME -o jsonpath="{.spec.containers[0].ports[0].containerPort}")
  echo "Visit http://127.0.0.1:8080 to use your application"
  kubectl --namespace default port-forward $POD_NAME 8080:$CONTAINER_PORT
You can see the templated content of the NOTES.txt explaining how to connect to the application.
Now, you can retrieve the release in the Helm workspace:
$ helm list
NAME    NAMESPACE       REVISION        UPDATED                                 STATUS          CHART           APP VERSION
nginx   default         1               2022-03-14 12:01:46.926038 +0100 CET    deployed        nginx-0.1.0     1.0.0
Upgrade The Helm Release
Imagine you want to upgrade the container image to 1.21.6 for testing purposes.
Instead of creating a new values.yaml, we'll change the setting from the command line.
$ helm upgrade nginx nginx --set image.tag=1.21.6
Release "nginx" has been upgraded. Happy Helming!
NAME: nginx
LAST DEPLOYED: Mon Mar 14 12:04:40 2022
NAMESPACE: default
STATUS: deployed
REVISION: 2
NOTES:
1. Get the application URL by running these commands:
  export POD_NAME=$(kubectl get pods --namespace default -l "app.kubernetes.io/name=nginx,app.kubernetes.io/instance=nginx" -o jsonpath="{.items[0].metadata.name}")
  export CONTAINER_PORT=$(kubectl get pod --namespace default $POD_NAME -o jsonpath="{.spec.containers[0].ports[0].containerPort}")
  echo "Visit http://127.0.0.1:8080 to use your application"
  kubectl --namespace default port-forward $POD_NAME 8080:$CONTAINER_PORT
The pod is using the new container image as well:
$ kubectl get pod -l app.kubernetes.io/name=nginx -o jsonpath='{.items[0].spec.containers[0].image}'
nginx:1.21.6
The upgrade is visible in the chart history:
$ helm history nginx
REVISION        UPDATED                         STATUS          CHART           APP VERSION     DESCRIPTION
1               Mon Mar 14 12:07:33 2022        superseded      nginx-0.1.0     1.0.0           Install complete
2               Mon Mar 14 12:08:25 2022        deployed        nginx-0.1.0     1.0.0           Upgrade complete
Change is inspectable with helm diff:
$ helm diff revision nginx 1 2
default, nginx, Deployment (apps) has changed:
  # Source: nginx/templates/deployment.yaml
  apiVersion: apps/v1
  kind: Deployment
  metadata:
    name: nginx
    labels:
      helm.sh/chart: nginx-0.1.0
      app.kubernetes.io/name: nginx
      app.kubernetes.io/instance: nginx
      app.kubernetes.io/version: "1.0.0"
      app.kubernetes.io/managed-by: Helm
  spec:
    replicas: 1
    selector:
      matchLabels:
        app.kubernetes.io/name: nginx
        app.kubernetes.io/instance: nginx
    template:
      metadata:
        labels:
          app.kubernetes.io/name: nginx
          app.kubernetes.io/instance: nginx
      spec:
        serviceAccountName: nginx
        securityContext:
          {}
        containers:
          - name: nginx
            securityContext:
              {}
-           image: "nginx:1.21.5"
+           image: "nginx:1.21.6"
            imagePullPolicy: IfNotPresent
            ports:
              - name: http
                containerPort: 80
                protocol: TCP
            livenessProbe:
              httpGet:
                path: /
                port: http
            readinessProbe:
              httpGet:
                path: /
                port: http
            resources:
              {}
Rollback The Helm Release
The upgrade was not conclusive and you want to go back. As Helm keeps all the changes, rollback is very straightforward:
$ helm rollback nginx 1
Rollback was a success! Happy Helming!
The pod is now back to 1.21.5 container image:
$ kubectl get pod -l app.kubernetes.io/name=nginx -o jsonpath='{.items[0].spec.containers[0].image}'
nginx:1.21.5
Uninstall The Helm Chart
Uninstalling a Helm chart is trivial as the installation:
$ helm uninstall nginxReuse Existing Helm Charts
A lot of famous projects provide Helm charts to make the integration more user-friendly. They provide the charts through a repository. You have just to add it on your side:
$ helm repo add bitnami https://charts.bitnami.com/bitnami
Once added, update your local cache to synchronize info with remote repositories:
$ helm repo updateYou can now install the chart on your Kubernetes cluster:
$ helm install nginx bitnami/nginxCharts are deployed with default values. You can inspire and specify a custom values.yamlto match your needs!
$ helm install my-release bitnami/nginx -f values.yaml